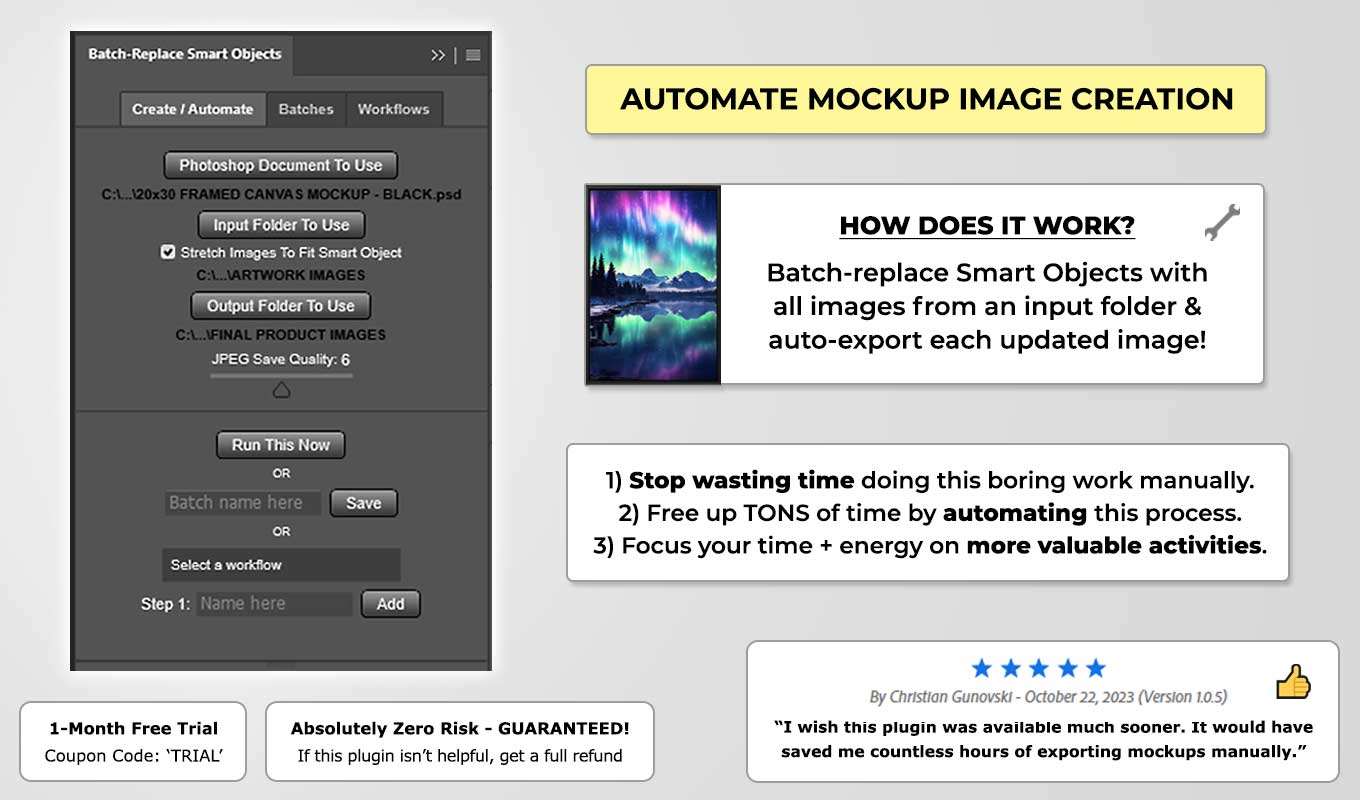
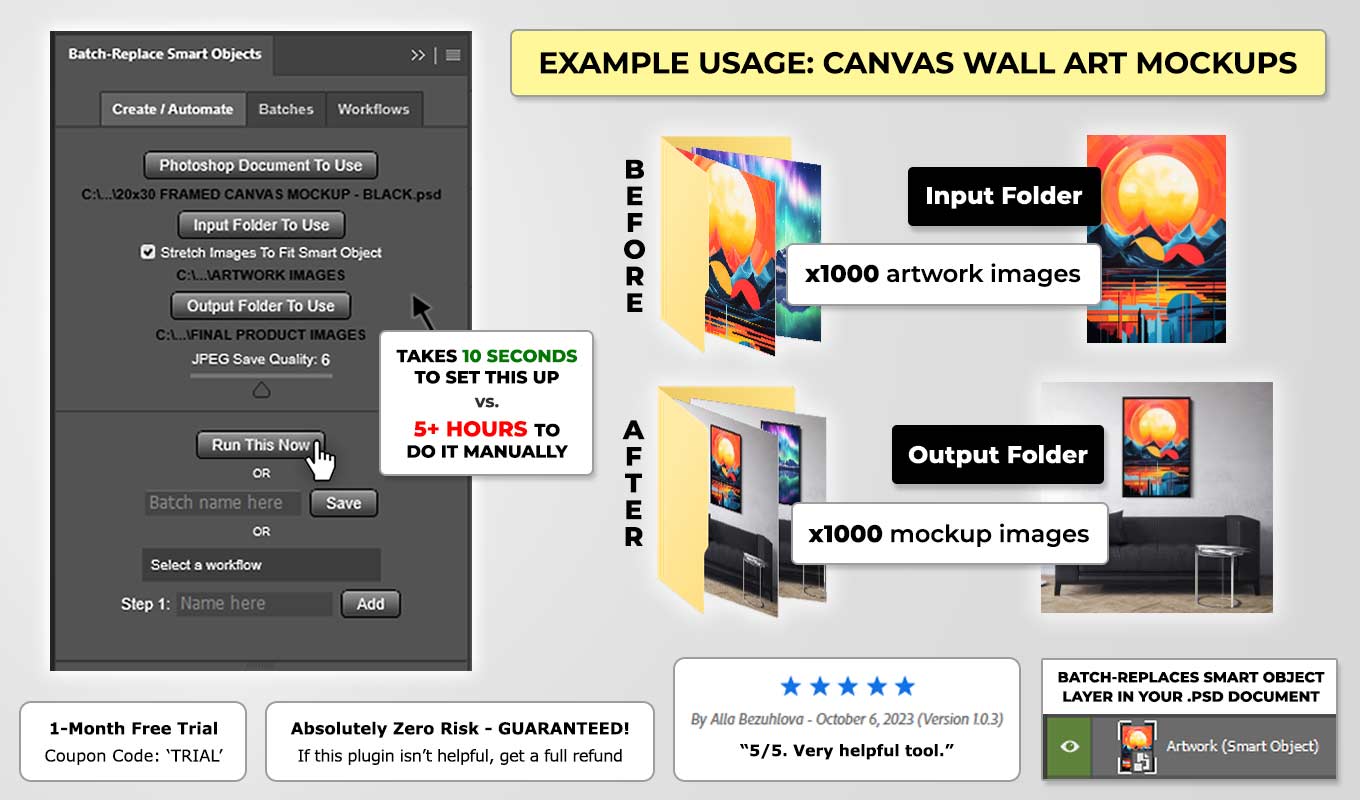
This Photoshop Plugin automates mockup creation by batch-replacing the Smart Object layer
in your .psd mockup template. You can also automate multi-step operations — allowing you to iterate through multiple
mockup templates and create all your required mockup images with one single click.
Learn more on our official Adobe Listing Page:
https://exchange.adobe.com/apps/cc/8e3097ba/batch-replace-smart-objects
Supported Mockups:
(Our plugin is compatible with thousands of different .PSD mockup types!)
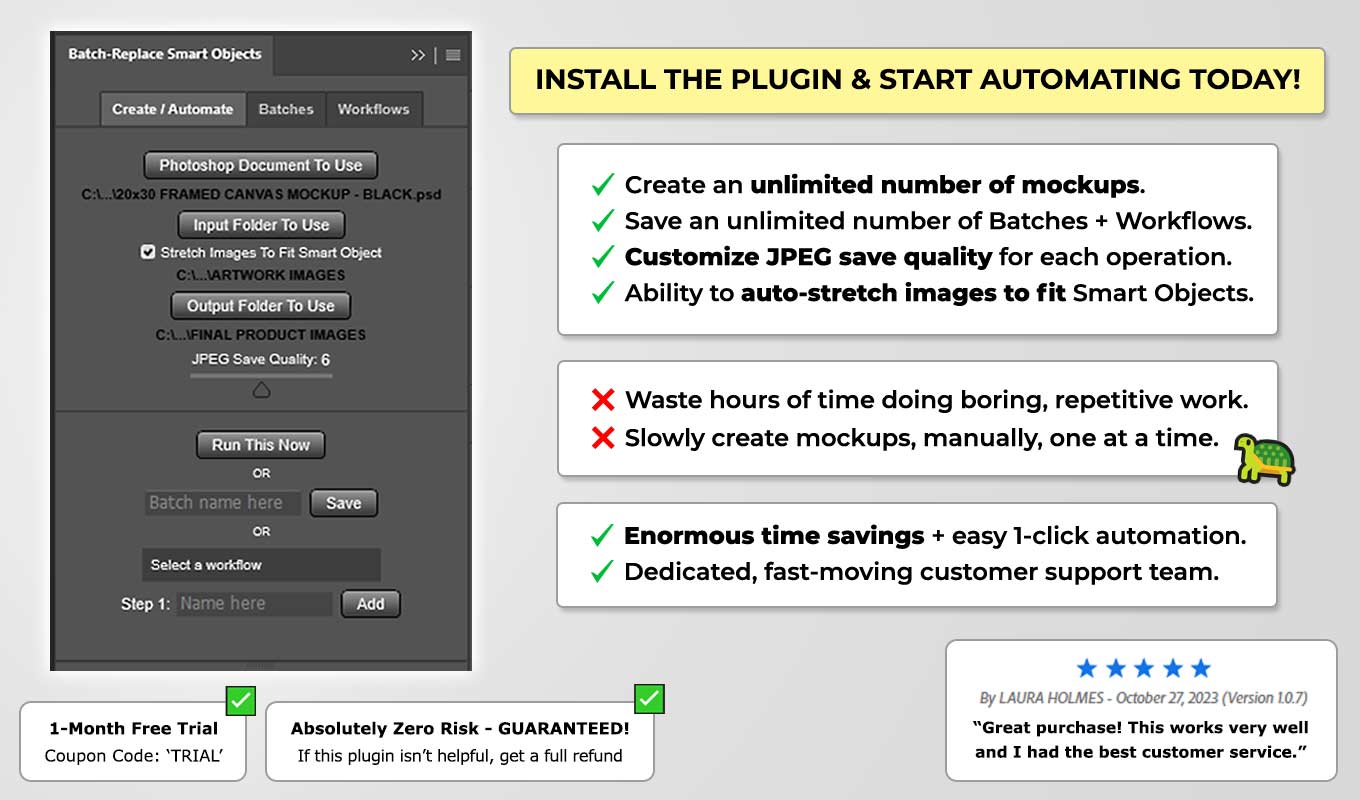
No, there are no limitations. You can automate the creation of an unlimited number of mockup images using this Photoshop Plugin.
This Photoshop Plugin works by automating the bulk-creation of mockup images using .PSD mockup templates which contain a Smart Object layer that holds your artwork/design. To ensure compatibility, please check to ensure that this is the filetype and setup of your mockup templates. (Note that this is the standard and most commonly-used document format and filetype for downloadable mockup templates.)
You want to ensure that your mockup template has a visible Smart Object layer which corresponds to the layer you want to perform the batch-replacement operation on. If your .PSD mockup template is a complex document that contains multiple Smart Object layers, you must select *just one* of these layers in the Photoshop document, so that our software will know which Smart Object layer you want to perform the automated image-replacement operation on. As a safeguard feature, our plugin will display an alert message if it is unsure of which Smart Object layer you want to use. If your .PSD mockup template contains just one Smart Object layer, our plugin will assume that's the desired target layer, and it will automatically perform the batch-replacement operation on that layer.
You should also ensure that there are no visible duplicate layers on top of your targeted Smart Object layer. Some .PSD documents contain multiple similar Smart Object layers — however if *several* of these are set to visible, and if your selected Smart Object layer in the document is *below* one (or more) other visible Smart Object layers, this can have the unintended effect of performing the batch-replacement operation on a functionally hidden/covered-up layer, which would make it appear as though nothing is happening when you run the operation. This is why it's important to carefully inspect the structure and layers of your .PSD mockup templates before use, to ensure they're set up to work correctly for an automated batch-replacement operation.
If you are using this tool to create an enormous number of mockup images, and your goal is to maximize the speed and throughput of the automated operations, it's recommended that you follow several best-practices.
Optimize your .PSD mockup template for maximum automated throughput by decreasing the file size.
This can be achieved by removing unnecessary extra layers, merging layers where possible, and also by reducing the overall aspect ratio / canvas size of the .PSD document as a whole.
Many .PSD mockup templates have a very large canvas size (for example, 4000 x 4000 pixels), when in reality your desired final mockup images may only need to be 1000 x 1000 pixels. Performing batch-replace-and-export operations on very large .PSD documents will obviously take a longer time to perform. You can streamline the efficiency of your automated operations by resizing the canvas size of the .PSD document to be at your desired final mockup-image aspect ratio. So if you want your final mockup images to be 1000 x 1000 pixels, simply resize the .PSD mockup template document as a whole to have it already be at that final size. This will also save time by eliminating the need for any extra post-processing steps that resize your mockup images.
Another opportunity to reduce the file size of your .PSD mockup template comes from merging layers in the document. For example, many .PSD mockup templates will have several complex background layer elements: perhaps it's a room mockup scene that allows you to customize the color of the wall, move around the different furniture elements, etc. Once the mockup scene is set up in the desired way, you can reduce the file size dramatically by simply merging all of these background layers into one.
Finally, many .PSD mockup templates will include several different variants of the Smart Object mockup section. For example, a canvas wall art mockup template may include 20 different wall art sizes to account for every possible artwork aspect ratio. It may include mockups whose aspect ratios are 24x48, 24x36, 24x24, etc. If your workflow is standardized, and you know which specific mockup in the scene you are going to be using, you can simply delete all of these other sizes/mockups in the .PSD document to greatly reduce the file size and increase the speed of the automated operations.
(Note that if you are going to modify/customize your .PSD mockup templates in these ways, it is highly recommended that you back up the original file in case any mistakes are made, or in case any revisions need to be made to your workflow / to the mockup in the future.)
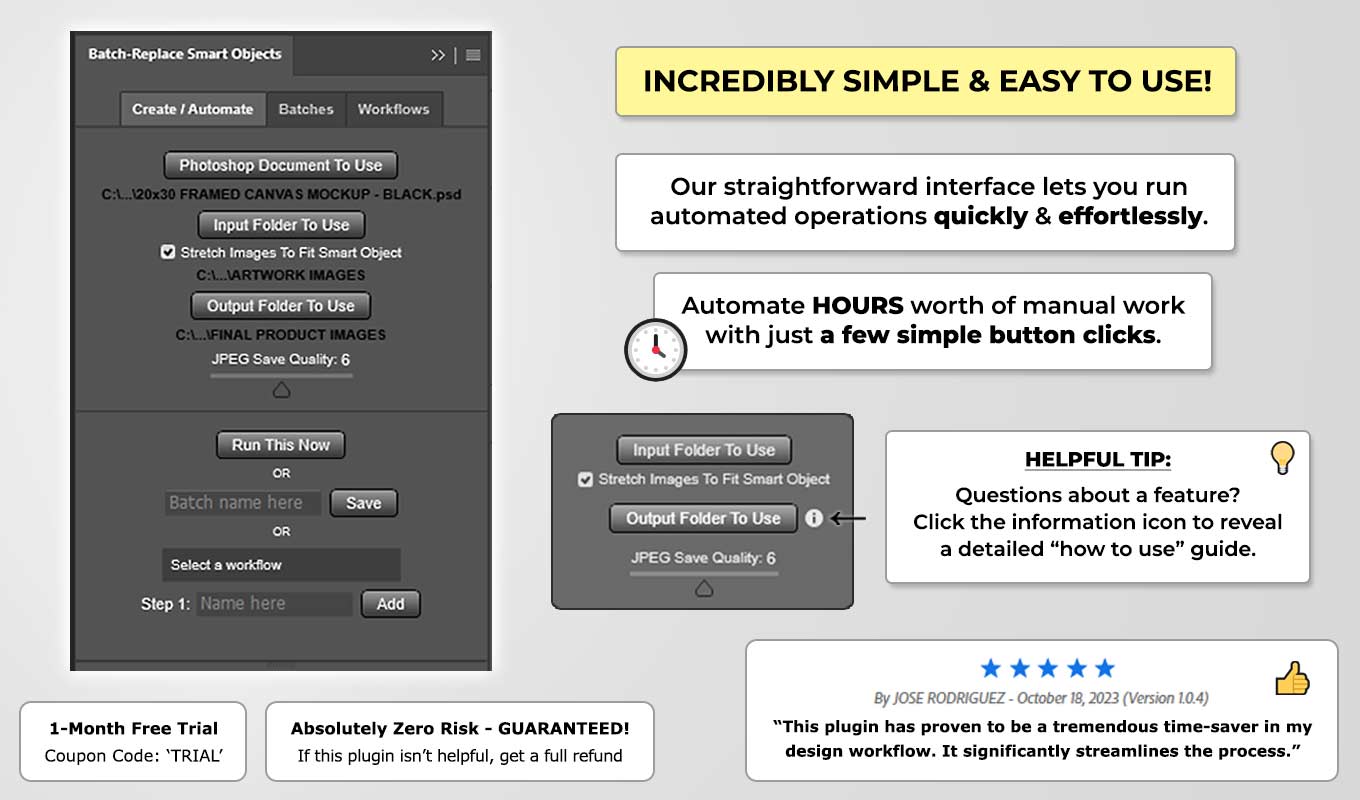
Optimize the speed of your bulk mockup-image creation operations by de-selecting the "Stretch Images To Fit Smart Object" checkbox.
IMPORTANT NOTE: This is ONLY recommended if your workflow can absolutely guarantee that the artwork/design images in your input folder will perfectly match the aspect ratio and resolution/DPI of the Smart Object. "Stretch Images To Fit Smart Object" is the recommended default setting when using this Photoshop Plugin, to ensure that your final mockup images have the desired appearance. If the aspect ratio OR resolution of your input folder's artwork/design images vary, this will have the undesired effect of producing mockup images where the input image is too large or too small, relative to the Smart Object's container size.
With that important warning out of the way, if your workflow ensures perfect consistency in your input folder's aspect ratio and resolution, unchecking this option provides another opportunity to increase the speed of your automated operations. When "Stretch Images To Fit Smart Object" is selected, this increases the runtime of the automated operation since there's the additional step of resizing each image from your input folder to perfectly fit the Smart Object. Unchecking this option removes that intermediate step, thus increasing the speed of your batch-replacement operations. If there is ANY possibility that the aspect ratio or DPI of your input images may vary, it is highly recommended that you keep the "Stretch Images To Fit Smart Object" option selected.
For best results, it is recommended that once an automated mockup-image-creation operation has begun, simply allow it to run to completion without any interference or interruptions. Clicking around inside of the Photoshop Plugin interface, trying to do additional work inside of Photoshop — these actions are likely to interfere with the ongoing operation and cause it to fail. Additionally, minimizing Photoshop and using other computer applications while your mockup images are being created is not recommended. To ensure that the plugin will most effectively and reliably automate the creation of all your desired mockup images, once an operation has begun, simply leave Photoshop as the open and active window on your computer, and allow the operation to run to completion. Following this advice is the best way to guarantee that your mockup images will be created in the most frustration- and error-free manner possible.
Yes, this Photoshop Plugin contains a slider on the main panel that allows you to modify the JPEG Save Quality of your final mockup images. You can set this value to anything from 0-12, with 0 producing the smallest file size / the lowest-quality image, and with 12 producing the largest file size / the highest-quality image.
It is recommended that you decide upon the optimal setting for your specific needs, because different workflows may require different levels of image compression and different final image qualities. If you're using your final mockup images for e-commerce product images, for example, it is likely that you'll want to apply some level of compression, so as to ensure that your image file sizes are not so large that it will slow down your website load time. In most cases it is likely that an optimal balance will need to be struck between applying some degree of image compression, to reduce file size, but not applying so much compression that the final mockup image quality gets degraded. You can simply test out a few different settings to find out what works best in your specific use-case.
This Photoshop Plugin has a "Stretch Images To Fit Smart Object" checkbox that will automatically resize all images from your input folder to perfectly match the existing Smart Object settings. So even if the aspect ratios or resolutions of your input images vary, as long as this checkbox is selected, the final mockup images should still look as intended.
Also a technical note about how this setting works: It does NOT apply these adjustments to the original images in your input folder. The technical way this feature works is, when this checkbox is selected, it creates a *copy* of the input image, sets the aspect ratio and resolution of this copied image to perfectly match the Smart Object, performs the "replace Smart Object and export the mockup image" operation using this resized image, and then immediately deletes this modified image so as to not needlessly use up extra space on your computer and so as to not modify your original input images in any undesired ways.
As of this writing, the 'Batch-Replace Smart Objects: Automate Mockups' plugin for Photoshop supports .jpeg/.jpg, .png and .ai image filetypes from your input folder. This list of supported filetypes may be expanded in the future, based upon demand. You can always find the most recent list of accepted filetypes on our official Adobe Listing Page for the plugin.
As of this writing, the 'Batch-Replace Smart Objects: Automate Mockups' plugin for Photoshop exports your final mockup images as .jpeg images. This list of supported filetype options may be expanded in the future, based upon demand. You can always find the most recent list of supported export settings on our official Adobe Listing Page for the plugin.
Yes, this Photoshop Plugin supports .png images, and your final mockup images will preserve whatever transparency exists in your .png input images.
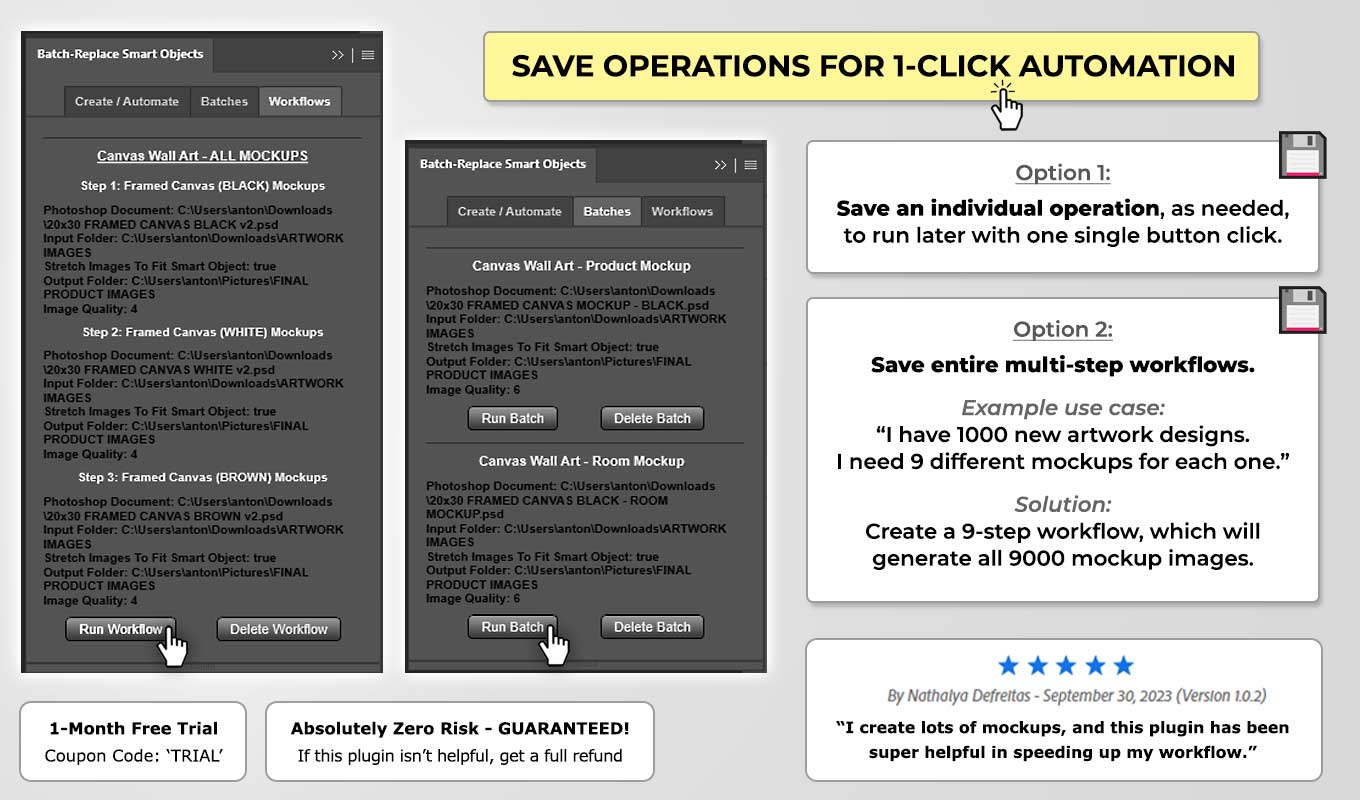
This Photoshop Plugin allows you to save operations to run later with one click, as needed. Simply input a name in the textbox and click the 'Save' button once your automated operation has been set up and your settings have been specified. You can access all of your saved operations in the 'Batches' tab, and you can run the desired operation with one single button click, using your previously inputted settings.
Yes, this Photoshop Plugin allows you to automate your entire mockup image creation workflow, even if you need to iterate through multiple .PSD mockup templates in sequence. So if, for example, you have 5 different .PSD mockup templates you'd like to use, you can set up and save a 5-step Workflow that will batch-create all of your desired mockup images. Step 1 of this Workflow would open the first .PSD mockup template, and bulk-generate all of your mockup images using that first mockup template and the images from your specified input folder. Step 2 would then open the second .PSD mockup template, and bulk-generate all of those mockup images using that second mockup template. Etc, for as many steps as are needed. All of your saved multi-step Workflows can be accessed in the 'Workflows' tab, and you can run the desired multi-step operation with one single button click.
Unfortunately our Photoshop Plugin does not support the simultaneous batch-replacement of multiple Smart Objects in one single .PSD mockup template. If your mockup template contains more than one Smart Object layer, only one of these must be selected for the automated operation to be able to run — and the plugin will perform the batch-replacement operation on that one single selected Smart Object layer. (Note that you CAN set up multi-step operations that allow you to iterate through several different .PSD mockup templates in sequence. So if you're using 5 different .PSD mockup templates, you can set up a multi-step workflow where Step 1 will automate the creation of your mockup images using the first mockup template, Step 2 will create your mockup images using the second mockup template, etc. However the plugin does not support operations where one single mockup template contains several different Smart Objects that you want to simultaneously or sequentially batch-replace.)
We understand that perhaps there are use-cases where batch-replacing multiple Smart Objects in the same .PSD document simultaneously would be desirable. For example, perhaps you have a mockup scene containing multiple different brochures and paper items laid out on a table, to showcase a newly-designed logo in multiple different formats. Or, alternatively, perhaps you have a room mockup scene where you want to showcase a matching set of 3 different canvas wall art items. At present, our plugin does not support these complex operations.
Our goal was to make the user interface as simple as humanly possible, and in 99% of use-cases, the batch-replacement of a single Smart Object layer is all that's actually needed to produce the desired final mockup images. We decided that the ability to handle these complex multi-Smart-Object-replacement operations (along with all possible accompanying logic options) would have greatly cluttered the user interface and introduced a widely complex set of branching options that would be completely irrelevant to the vast majority of users and use-cases. We understand that some use-cases may require a more complex automated workflow, and in those cases, a custom automated solution tailored to your specific workflow is likely going to be necessary.
Once your specified operation has been completed, and all of your mockup images have been created, our Photoshop Plugin will display a simple alert message notifying you that the specified operation has been fully completed.
Yes, the mockup images you create using this Photoshop Plugin are yours to use in any manner you see fit, including commercially for a print-on-demand store. We do not retain the copyright to any of the images created using our plugin; it is simply a tool to help facilitate the automated creation of your mockup images.
Yes, the mockup images you create using this Photoshop Plugin are yours to use in any manner you see fit, including commercially for freelance or industry graphic design. This includes logo design, branding design, advertising design, print design, package design, and other graphic design tasks performed either for clients or for an industry workplace. We do not retain the copyright to any of the images created using our plugin; it is simply a tool to help facilitate the automated creation of your mockup images.
Yes, the mockup images you create using this Photoshop Plugin are yours to use in any manner you see fit, including personal or commercial use-cases such as showcasing your photography work or your artwork/design creations. We do not retain the copyright to any of the images created using our plugin; it is simply a tool to help facilitate the automated creation of your mockup images.